Server 2012 Lab Questions Ch. 1
A limited time offer! Get a custom sample essay written according to your requirements urgent 3h delivery guaranteed
Order NowEach lab in this manual requires that you answer questions, create screen shots, and perform other activities that you will document in a worksheet named for the lab, such as Lab01_worksheet.docx. It is recommended that you use a USB flash drive to store your worksheets, so you can submit them to your instructor for review. As you perform the exercises in each lab, open the appropriate worksheet file, fill in the required information, and save the file to your flash drive. After completing this lab, you will be able to:
Perform a clean Windows Server 2012 installation on a bare metal computer Upgrade a server to Windows Server 2012
Install the Windows Server Migration Tools
Estimated lab time: 60 minutes
Exercise 1.1
Performing a Clean Installation
Overview
In this exercise, you install Windows Server 2012 on a new computer with no previously installed operating system. Mindset
In many cases, organizations purchase servers without operating systems installed—sometimes called bare metal servers—either because they have an existing license agreement or because they intend to purchase the OS through another channel. In these cases, you perform what is known as a clean operating system installation, which is a procedure that creates a new server with its default operating system settings. Completion time
10 minutes
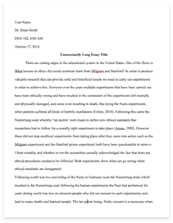
1.Select the SVR-SO-A computer, on which the Windows Server 2012 installation disk is mounted and loaded. The Windows Setup page appears. 2.Click Next to accept the default values for the Language to install, Time and currency format, and Keyboard or input method parameters. Another Windows Setup page appears. 3.Click the Install now button. The Select the operating system you want to install page appears. 4.Select Windows Server 2012 Datacenter (Server with a GUI) and click Next. The License terms page appears. 5.Select I accept the license terms and click Next. The Which type of installation do you want? page appears. 6.Click Custom: Install Windows only (advanced). The Where do you want to install Windows? page appears (see Figure 1-1).
Figure 1-1
The Where do you want to install Windows page
7.Select Drive 0 Unallocated Space and click Next. The Installing Windows page appears as the system installs Windows Server 2012.
What should you do if the drive on which you want to install Windows Server 2012 already has a partition on it containing an operating system and data you do not need? Reformat the drive and make a new partition for the OS
Question 2
What should you do if the Where do you want to install Windows? page appears, but it does not list any drives or partitions? Make sure that the drive is plugged in. If it is, do Load Driver if using a RAID controller.
8.After several minutes and a system restart, the Settings page appears. 9.In the Password and Reenter password text boxes, type Pa$$w0rd and click Finish. The Windows security page appears, showing the time. 10.Click Ctrl+Alt+Del and log on using the Administrator account with the password Pa$$w0rd. The Server Manager console appears. 11.Click Local Server in left pane, then click the Computer Name link. The System Properties sheet appears. 12.Click Change. The Computer Name/Domain Changes dialog box appears. 13.In the Computer name text box, type SVR-SO-A and click OK. A
message box appears, telling you to restart the computer. 14.Click OK. Then click Close. Another message box appears. 15.Click Restart Now. The system restarts.
End of exercise. You can leave the windows open for the next exercise. Exercise 1.2
Performing an Upgrade Installation
Overview
In this exercise, you install Windows Server 2012 on a computer running Windows Server 2008 R2. Mindset
Assuming that a server meets all the requirements and has compatible drivers and applications installed, it is possible to perform an in-place upgrade, which retains all the system’s software, data, and configuration settings. However, the more complex the server configuration, the more likely it will be for incompatibilities to arise, resulting in an end result that is unstable or otherwise problematic. Completion time
20 minutes
1.Select the SVR-SO-B computer, which loads Windows Server 2008 R2 and displays the Server Manager console. 2.Using Server Manager, determine which roles are installed on the server and make a note of them in the space on your worksheet. FIle Server
Web Server (ISS)
3.Click Start > Run. The Run dialog box appears.
4.In the Open text box, type d:\setup.exe and click OK. The Windows Setup window for Windows Server 2012 appears. 5.Click Install Now. The Get important updates for Windows Setup page appears. 6.Click No thanks. The Select the operating system you want to install page appears. 7.Select Windows Server 2012 Datacenter (Server with a GUI) and click Next. The License terms page appears. 8.Select I accept the license terms and click Next. The Which type of installation do you want? page appears. 9.Click Upgrade: Install Windows and keep files, settings, and applications. The
compatibility report page appears. Question3
Under what conditions would the Upgrade option not be available to you during the Windows Server 2012 installation process. If the version of Windows Server was too old to be upgraded.
10.Review the compatibility information provided and click Next. The Upgrading Windows page appears. Question4
The compatibility notes that appear during this exercise are recommendations; they do not prevent you from performing the upgrade. However, in a real-world upgrade situation, this might not be the case. Give an example of a compatibility note that will stop the upgrade process and force you to take action before restarting the installation. No proper driver support for older RAID/NIC cards.
11.The upgrade process installs Windows Server 2012 and any compatible applications that existed on the server before you began the upgrade. The computer restarts several times and ends up on the main logon screen.
Note
The length of time required for the Windows Server 2012 upgrade process can be 20 minutes or more, depending on the number and type of applications, files, and configuration settings on the computer at the outset.
12.Click Ctrl+Alt+Del and log on using the Administrator account and the password Pa$$w0rd. The Windows Server 2012 desktop appears and Server Manager loads. 13.Click Local Server in the left pane, take a screen shot of the Properties window by pressing Alt+Prt Scr, and then paste it into your Lab 1worksheet file in the page provided by pressing Ctrl+V.
14.Using Server Manager, determine which roles are installed on the server and make a note of them in the space on your worksheet.
Question5
What proof do you have that the procedure just completed has upgraded the
operating system on the computer and not just performed a new, clean installation? The roles are still in the server listing.
End of exercise. You can leave the windows open for the next exercise.
Exercise 1.3
Installing Windows Server Migration Tools
Overview
In this exercise, you install the Windows Server Migration Tools, which enable you to migrate roles from an existing server to a new server running Windows Server 2012. Mindset
Compared to an in-place upgrade, a side-to-side migration is a more complex procedure, but usually results in a more stable server configuration. Windows Server 2012 includes tools that facilitate the migration of certain roles, but before you can use them, you must deploy those tools on both the source and the destination server. Completion time
10 minutes
1.Select the SVR-SO-A computer, on which you installed Windows Server 2012, previously in this lab. SVR-SO-A will be the destination server in the migration. 2.Click Ctrl+Alt+Del. The Windows login page appears, with the Administrator user account. 3.In the Password text box, type Pa$$w0rd and press Enter. The Server Manager console loads. 4.In Server Manager, click Manage > Add Roles and Features. The Add Roles and Features Wizard appears, displaying the Before you begin page. 5.Click Next. The Select installation type page appears.
6.Click Next to accept the default Role-based or feature-based installation type. The Select destination server page appears. 7.Click Next to accept the default settings, which install the selected roles and features to the local server. The Select server roles page appears. 8.Click Next to continue. The Select features page appears (see Figure 1-2).
Figure 1-2
The Select features page of the Add Roles and Features Wizard
9.Select the Windows Server Migration Tools check box and click Next. The Confirm installation selections page appears. 10.Click Install. The wizard installs the Windows Server Migration Tools feature. 11.When the installation is completed, click Close. The wizard closes. 12.To install the Windows Server Migration Tools on SVR-SO-C, the source server in the migration, you must create a distribution folder on SVR-SO-A and populate it with the installation files for the tools. To create a distribution folder for the Windows Server Migration Tools on SVR-SO-A, open the Start screen and right-click anywhere around the border to display the icon bar. Question6
Why can you not install the Server Migration Tools to the server running Windows Server 2008 server using the Add Roles and Features Wizard on your server running Windows Server 2012? You cannot apply roles to lower versions of Windows Server using the GUI, it has to be done though powershell or command line.
13.Click All apps. The Apps page appears.
14.Right-click Command Prompt and, from the icon bar, select Run as administrator. An Administrator: Command Prompt window appears. 15.At the prompt, type cd \windows\system32\ServerMigrationTools and press Enter. 16.At the prompt, type SmigDeploy.exe /package /architecture “amd64” /os WS08R2 /path “C:\users” and press Enter. The program creates the Windows Server Deployment Tools distribution folder in the specified location. 17.Take a screen shot of the Command Prompt window by pressing Alt+Prt Scr and then paste it into your Lab 1 worksheet file in the page provided by pressing Ctrl+V. 18.To share the distribution folder, in the Command Prompt window, type net share WSMT=C:\Users. End of exercise. You can leave the windows open for the next exercise.
Lab Challenge
Accessing a WSMT Distribution Point
Overview
After completing Exercise 1.3, a user on SVR-SO-C, the source server for the migration, can access the installation files for the Windows Server Migration Tools from the distribution point on the destination server, SVR-SO-A. Mindset
After creating a distribution point for the Windows Server Migration Tools on the server running Windows Server 2012, the source server can access the distribution point over the network, or by copying the files on a portable storage device. Completion time 10 minutes
To complete the challenge, you must install the Windows Server Migration Tools on SVR-SO-C by accessing the shared distribution folder on SVR-SO-A and running the Smigdeploy.exe program with no parameters from an Administrative command prompt. Then, take a screen shot of the Command Prompt window b
y pressing Alt+Prt Scr and then paste it into your Lab 1worksheet file in the page provided by pressing Ctrl+V.
Hint
The distribution folder is already shared on SVR-SO-A, but before SVR-SO-C can access the share, you must turn on File and Printer Sharing on SVR-SO-A.
End of lab. You can log off or start a different lab. If you want to restart this lab, you’ll need to click the End Lab button in order for the lab to be reset.


